TensorFlow: Recurrent Neural Networks
Introduction
まず,LSTM articleを読んだほうがいい.わかりやすいので読んだほうがいい.
rnn_cell.pyを見ると,
- BasicRNNCell: 普通のRNN
- BasicLSTMCell: peep-holeがないLSTM
- LSTMCell: peep-holeがあるLSTM. さらに,cell clippingとprojection layerがoptionとして用意されている
- GRUCell: Gated Recurrent Unit, input gateとforget gateを一緒にして,さらに,cell stateとhidden stateを一緒にしたLSTM簡易版
が,現時点(20151228)LSTMのアーキテクチャとして用意されている.
他にもいろいろバリアンスは考えれるけれど,Greff, et al. (2015)によると,どれも大差なく,forget gateの役割があることとoutput activation functionがあることが重要とのこと.また,Jozefowicz, et al. (2015)によると,LSTMのアーキテクチャは,タスク依存の部分もあるとのこと.なので,上記くらいのLSTMのアーキがあれば,基本は十分と思われる.
また,rnn_cell.pyをみると,InputProjectionWrapper, DropoutWrapper, EmbeddingWrapper, OutputProjectionWrapperと典型的にLSTM前後に挟むレイヤーのラッパーが用意されている.
ちなみに,この記事を書いている時点では,RNNCellはstateを保持しない実装になっている.この辺は議論されているよう.なので,python apiにはrnnの項目がまだない.
Language Modeling
単語列が与えられたらその次に出てくる単語を当てるという問題.Penn Tree Bank (PTB) Datasetを使って行う.
Tutorial Files
| File | Purpose |
| ptb_word_lm.py | The code to train a language model on the PTB dataset. |
| reader.py | The code to read the dataset |
Download and Prepare the Data
wget http://www.fit.vutbr.cz/~imikolov/rnnlm/simple-examples.tgz
で既に前処理済みのデータを持ってくる.10,000単語くらいあって,rare wordsは"<unk>" symbolになっていて,end-of-sentence markerも付いている.
simple-examples.tgzの中身をみると,data以外にも幾つかサンプルがある.charactor-basd RNNのサンプルも入っている.
./simple-examples/data/ptb.train.txt を見るとptbデータは非常に長い1doc分のデータのようになっている.
The Model
モデルの説明.
LSTM
RNNでもbatch単位で実行するのは一緒.擬似コードは以下.
lstm = rnn_cell.BasicLSTMCell(lstm_size)
# Initial state of the LSTM memory.
state = tf.zeros([batch_size, lstm.state_size])

loss = 0.0
for current_batch_of_words in words_in_dataset:
    # The value of state is updated after processing each batch of words.
    output, state = lstm(current_batch_of_words, state)

    # The LSTM output can be used to make next word predictions
    logits = tf.matmul(output, softmax_w) + softmax_b
    probabilities = tf.nn.softmax(logits)
    loss += loss_function(probabilities, target_words)
Truncated Backpropagation
長ーい系列を全部を見て,backpropするとうまく学習できないので,ある程度の長さでgradientを打ち切る.
が本問題のサンプルコードになっている.サンプルコード上は,PTBModelのinitでunrolled graphを作って,run_epochでデータセットを一回なめている.1 epoch経つとstateを0に戻す.
扱うタスクに依っては,RNNではbatch単位でstateを忘れたり(0に戻す)するが,ptbは,非常に長い系列なので,データの作り方を工夫(reader.py#ptb_iterator)して,batch単位でstateを忘れないようにし,batch単位でstateを引き継いでいる.そして,次のepochではstate を0にしている.
サンプルコードはいちからtruncated backprop用のunrolled graphを作っているが,rnn.pyにcellだけ指定すれば,RNNを作ってくれる便利モデルがある.
def rnn(cell, inputs, initial_state=None, dtype=None,
        sequence_length=None, scope=None):
  """Creates a recurrent neural network specified by RNNCell "cell".
こんな感じのインターフェイスになっているので,documentをまたぐとかuserをまたぐときに,initial_stateを0にして,前の状態を忘れればいいと思う.
Inputs
この次の単語予測の問題では,indexingされた単語が入力なので,
# embedding_matrix is a tensor of shape [vocabulary_size, embedding size]
word_embeddings = tf.nn.embedding_lookup(embedding_matrix, word_ids)
な感じで,word embeddingしてからLSTMに入れる.
これでは,線形変換の行列は,で
の変換だけれども,rnn_cell.pyのlinear関数では,
の変換になっており,わざわざcell sizeにprojectionしないでも良いようになっている.
Loss Fuction
over wordsで誤差を計算する.
このインプリは簡単だけど,sequence_loss_by_exampleが定義されているので,これを使って良いとのこと.
実際の典型的な評価基準は, average per-word perplexity (just called perplexity)を使う.
lossにexpをつけただけ.
Stacking multiple LSTMs
LSTMをstackしたかったら,interfaceが用意されていて,
lstm = rnn_cell.BasicLSTMCell(lstm_size)
stacked_lstm = rnn_cell.MultiRNNCell([lstm] * number_of_layers)
な感じで,cellを作ってから,積み重ねたい分(number_of_layers)だけ,cellを積み重ねる.
Run the Code
とりあえず,動かしたいなら
cd tensorflow/models/rnn/ptb
python ptb_word_lm --data_path=${/tmp/simple-examples/data} --model small
こうする.
modelのサイズに依ってperplexityが変わることがわかる.small, medium, largeが用意されていて,largeなほどperplexityが小さくなる.
TensorFlow: Vector Representations of Words
word2vec modelの例.word embeddingsていう単語のベクトル表現に使用するembedding matrixを学習で求めるモデル.
Highlights
- WordをVectorとして表現したい動機
- modelの直感的解釈とどうやって訓練するか
- TFでどうやってやるか
- Scaleさせるやり方
Motivation: Why Learn Word Embeddings?
Image, Audioデータはデンスで,人間でも生のデータからこれらの領域のタスクを取り扱える.Textはスパースで取り扱いづらい.よくidで表現するけれど,この生のidデータ自身は待ったく意味を持たない.NLPの分野ではこの問題に昔から取り組んできた.Vector Space Models (VSMs)はwordを連続な空間で取り扱う,意味的に近い単語は,この空間で近くにマップされるという考え方. Distributional Hypothesisっていう仮定があって,同じコンテキストで出てくる単語は意味を共有している.
2つのアプローチがあって,count-based (e.g., Latent Semantic Analysis)とpredictive model (neural probabilistic language models)がある.
count-basedは大きいコーパスから近くに出てくる単語の統計値をとって,このmapを使って,小さいデンスなベクトルにする.predictive modelは,ある単語の近くにある複数の単語から,学習された小さいデンスなエンベッドベクトルを使って,ある単語を予測する.
Word2vecっていうのは,生のテキストから学習されるword embedding計算量的にイケているpredictive model.Continuous Bag-of-Words model (CBOW) と the Skip-Gram modelでいう2ついい点がある.Continuous Bag-of-Words model (CBOW)は,ソースとなる複数の単語(context words)から次の単語を予測する.Skip-Gramはこれの逆変換で,単語から複数の単語(context words)を予測する.統計的には,CBOWは,多くの分布情報を平滑化するので,小さいデータセットで役立つ.Skip-Gramは,context, targetのペアを新しい観測として取り扱うので,大きいデータセットでうまく機能する.
Scaling up with Noise-Contrastive Training
普通,目的関数はLog-Likelihoodを使い,likelihoodには,softmax(socre(w_t, h))を使う.例えば,w_tは時刻tのおける次のword, hはコンテキストベクターを想像しておけば良い.何も考えずにsoftmaxを使うと,NLPのword predictionのようにクラスが非常に多い場合には,softmaxの母数のノーマライズでVocabularyの中にあるすべての単語に関してsocreをとる操作が非常に計算コストが高い.
なので,Vocab中のすべての単語ではなくて,nosise wordsを考えて,実際に予測したい単語 vs noise wordsのbinary logistic regressionを考える.
これを見ると,プラクティカルには,第1項は,実際に予測したい単語のscore(w_t, h)にlogistic funtionをとって対数をつけた項で,第2項は,nosie wordsの分布で測った対数尤度の期待値,kはnosie wordsの数,は
を考えておけば良い.これはNegative Samplingとも呼ばれる.
TFだと,
tf.nn.nce_loss()
を使う.他にも
tf.nn.sampled_softmax_loss()
が代替としてある.
The Skip-gram Model
例として,こんな文がある.
the quick brown fox jumped over the lazy dog
この文からdatasetを作る場合は,ある単語をtargetとしてその周辺単語(e.g., 周辺1つ)をコンテキストとして,(context ,target)-pairをつくると
([the, brown], quick), ([quick, fox], brown), ([brown, jumped], fox), ...
な感じ.skip-gramモデルだと,targetからcontextを予想するので,この場合は,
(quick, the), (quick, brown), (brown, quick), (brown, fox), ...
こういう(input, output)-pairのデータセットを想定すればいい.
学習されたword embeddingsでwordをvector spaceにプロジェクトしてから, t-SNEで,2-dへ次元圧縮して可視化すると構造論とか意味論的に面白い結果が得られる.特に,vector spaceでの方向に関して興味深い結果が得られる.例えば,king - queen = man - womanで,male - femaleという意味の結果になる.詳しくはMikolov et al., 2013
これは,4項類推とかにつかえる.例えば,
king is to queen as father is to ?
の質問に対して,vec(king) - vec(queen) = vec(father) - vec(x)の方程式を代替満たすxを答えにすればいい.
Building the Graph
TFで実際にどうやってWord2Vecをやるかの説明.
word2vec_basic.pyに書いてある内容の抜粋
embeddingsはvocabulary_size x embedding_sizeのデッカイ行列
embeddings = tf.Variable(
    tf.random_uniform([vocabulary_size, embedding_size], -1.0, 1.0))
embeddings layerしか考えないなら,いきなりlogistの計算をするためのW, bを作る.
nce_weights = tf.Variable(
  tf.truncated_normal([vocabulary_size, embedding_size],
                      stddev=1.0 / math.sqrt(embedding_size)))
nce_biases = tf.Variable(tf.zeros([vocabulary_size]))
単語は初めにinteger化しておくこと.するとinput/outputは
# Placeholders for inputs
train_inputs = tf.placeholder(tf.int32, shape=[batch_size])
train_labels = tf.placeholder(tf.int32, shape=[batch_size, 1])
なる.word2vecのvectorのlook-upは関数が用意されていて,
embed = tf.nn.embedding_lookup(embeddings, train_inputs)
word2vec_basic.pyをみると,
# Ops and variables pinned to the CPU because of missing GPU implementation
て書いてあるけれど,APIみても,embeddeding_looup/nce_lossのどちらかだかわからない.
nce lossを定義して,
# Compute the NCE loss, using a sample of the negative labels each time.
loss = tf.reduce_mean(
  tf.nn.nce_loss(nce_weights, nce_biases, embed, train_labels,
                 num_sampled, vocabulary_size))
train_labelsが入っているのに注目.
最後に,optを定義する
# We use the SGD optimizer.
optimizer = tf.train.GradientDescentOptimizer(learning_rate=1.0).minimize(loss)
Training the Model
sess.runする.
for inputs, labels in generate_batch(...):
  feed_dict = {training_inputs: inputs, training_labels: labels}
  _, cur_loss = session.run([optimizer, loss], feed_dict=feed_dict)
Visualizing the Learned Embeddings
word2vec.pyがサンプル.t-SNEを使って結果を2次元にmapしてくれる.
Evaluating Embeddings: Analogical Reasoning
4項類推での評価方法.データセットはここにあって,word2vec.pyに評価のサンプルがある.
Optimizing the Implementation
tf.nn.nce_lossの代わりにtf.nn.sampled_softmax_lossもある.I/O boundとおもったら,カスタムデータリーダーを実装すれば良い.例はword2vec.pyにある.I/O boundでなくて,もっと計算速度的なパフォーマンスが欲しかったらカスタムopを追加すればいい.例は,word2vec_optimized.pyにある.
Conclusion
ここではWord2Vecの例を学んだ.
TensorFlow: Convolutional Neural Networks
Overview
CIFAR10を使ってCNNおよびmulti-gpuでCNNをするサンプル.
CIFAR10データセットは,32x32pixelのカラー 画像で,クラスは10クラスある.大体まとめると.
| #classes | 10 |
| #samples/class | 6000 |
| #train samples | 50000 |
| #test samples | 10000 |
Goals
- DNNのアーキ,訓練,評価に関する標準のハイライト
- 大きくて良いモデルのテンプレを提供
Highlights of the Tutorial
Model Architecture
かの有名なAlexNetをちょっと変えたアーキ.
- # learable parameters = 1,068,298
- # multiply-add = 19.5M
CIFAR-10 Model
cifar10.pyには,だいたい765 opsがある.
コードの再利用性を高めるために次のように関数を分けるのがいい.
- Model inputs: inputs() and distorted_inputs()
- Model prediction: inference()
- Model training: loss() and train()
他のサンプルもこんな感じになっている.
Model Inputs
tf.FixedLengthRecordReaderでimageを読み込んで,example queueに入れてる.
前処理は
- cropping to 24x24 pixel
- whitening per image
- random flipping
- random brightning
- random contrasting
Model Prediction
NNのアーキは
conv + relu + pool + lrn
\+ conv + relue+ lrn + pool
\+ affine + relu
\+ affine + relu
\+ affine + linear_softmax
exerciseでcuda-convnetに合わせるように,softmaxにしろと書いてあるが無視.
予測するときは,expしてnormalizeしようがしまいが,最大値を取ったときのindexは同じなので無視する.ただし,cross entropyの計算では必要なので,"def loss"の中でやっている.
Model Training
分類問題なのでcross-entropyを使っている.目的関数には,誤差項にweight decay (L2 norm)を加えている.
Launching and Training the Model
実行の前に注意
ここによるとtag=0.6.0のだと動かないので,注意.tag=0.5.0に戻すことと書いてあるが,私の環境ではそれでも同じエラー(initしてないのにrunするなみたいなエラー)がでていた.
なぜかcpuのみの環境では動いたのと,cifar10_multi_gpu_train.pyは動いて
"tf.device('/cpu:0')"が,"tf.Graph().as_default()"についていたので,
in cifar10_train.py
with tf.Graph().as_default(), tf.device('/cpu:0'):
をつけてみると動いた.batch/sec的に計算はGPU計算されている用.これ書いている時点で,master branchで試したけど取り敢えずは動いた(他のtagでも動くと思う).理由はよく分かっていないが,こうしないとinitする前にopされているよう.
実行
python cifar10.py
Evaluating a Model
実行
python cifar10_eval.py
予測するときは,training時にとったtrain paramsの移動平均を使っている.一種のアンサンブルだと思う.こうすることで@1の精度が3%くらい上がるとのこと
Howtoをやっていると,コードを見ても,特によくわからない部分はない.
Training a Model Using Multiple GPU Cards
synchronous parallelで計算する.GPUにモデルレプリカを置く一番簡単な分散学習.model paramは,GPUで計算したgradientsをcpu deviceで集めて平均とって,アップデートする.
Placing Variables and Operations on Devices
モデルのレプリカをそれぞれGPUにおく.gradientの計算はそれらで行う.ここではこれをtowerと読ぶことにする.
- tower毎にoperationに,tf.name_scopeで,一意の名前をつける
- operationは,tf.device()で,gpuで計算する
すべての変数はcpuに保存されていて,計算するときに
tf.get_variable_scope().reuse_variables()
で,shareさせて,gpuがパラメータにアクセスできるようにする.
cifar10_train.pyとの大きな違いは,この部分で
    # Create an optimizer that performs gradient descent.
    opt = tf.train.GradientDescentOptimizer(lr)

    # Calculate the gradients for each model tower.
    tower_grads = []
    for i in xrange(FLAGS.num_gpus):
      with tf.device('/gpu:%d' % i):
        with tf.name_scope('%s_%d' % (cifar10.TOWER_NAME, i)) as scope:
          # Calculate the loss for one tower of the CIFAR model. This function
          # constructs the entire CIFAR model but shares the variables across
          # all towers.
          loss = tower_loss(scope)

          # Reuse variables for the next tower.
          tf.get_variable_scope().reuse_variables()

          # Retain the summaries from the final tower.
          summaries = tf.get_collection(tf.GraphKeys.SUMMARIES, scope)

          # Calculate the gradients for the batch of data on this CIFAR tower.
          grads = opt.compute_gradients(loss)

          # Keep track of the gradients across all towers.
          tower_grads.append(grads)

    # We must calculate the mean of each gradient. Note that this is the
    # synchronization point across all towers.
    grads = average_gradients(tower_grads)
- optimizerを作っておく
- loop for each tower
- lossを計算
- variable再利用
- gradsを計算
- average_gradientsを計算
している.
その後
    # Apply the gradients to adjust the shared variables.
    apply_gradient_op = opt.apply_gradients(grads, global_step=global_step)
でgradsをtower loopの前に作ったoptimizerに適用.
その後はほとんど一緒.
なので,tower loopが入って,tower lossの計算に,gpu deviceを使うのとtowerを区別するのにname_scopeを入れているのがsingle gpu版との主な違いな感じ.どこでsyncしているかというと,tower_lossの最後にcontrol_dependenciesを挟んでいるので,tower毎のlossの計算が全部終わるまでは,その後のaverageのopまで行かないと思う.単に,tf.device('/gpu:%d' % i)を抜けて,tf.device('/cpu:0')に入るからな気がする.tower_lossの中のcifar10.distorted_inputsで,filename_queueを作っているので,queueは,gpu device毎に存在すると思う.
Launching and Training the Model on Multiple GPU cards
python cifar10_multi_gpu_train.py --num_gpus=2
こんな感じで実行する.
TensorFlow: Deep MNIST for Experts
ここではinteractive sessionでCNNを書くチュートリアル.
Setup
Load MNIST Data
git clone https://github.com/tensorflow/tensorflow.git
してきて,ここに移動.
cd tensorflow/tensorflow/examples/tutorials/mnist
こんな感じでmnistデータを読み込み
import input_data
mnist = input_data.read_data_sets('MNIST_data', one_hot=True)
interactive sessionを立ち上げる.
import tensorflow as tf
sess = tf.InteractiveSession()
Build a Softmax Regression Model
ここではLogistic Regressionの例をinteractiveに説明する.
Placeholders
modelへのinput
x = tf.placeholder("float", shape=[None, 784])
y_ = tf.placeholder("float", shape=[None, 10])
784はinputの次元,Noneはbatchサイズで,どんなサイズでも良い.
Variables
graph上のパラメータ有りのインプット.機械学習のコンテキストではモデルパラメータと思っておけばいい.初めの引数にっているのは,init value.そのshapeの[784, 10]は,[input feature dim, output feature dim].この例ではoutput feature dim= num. of classes
W = tf.Variable(tf.zeros([784,10]))
b = tf.Variable(tf.zeros([10]))
実際にグラフを実行する前にinitする.TFでは,このinitもopになっている.
sess.run(tf.initialize_all_variables())
Predicted Class and Cost Function
Logistic Regressionなので,Affineしてからsoftmax.
y = tf.nn.softmax(tf.matmul(x,W) + b)
コスト関数は分類問題なので,クロスエントロピー.reduce_sumは,minibatch内のすべてのサンプルで和をとる.
cross_entropy = -tf.reduce_sum(y_*tf.log(y))
Train the Model
optimization opの追加
train_step = tf.train.GradientDescentOptimizer(0.01).minimize(cross_entropy)
これはGradientDescentだけど,抑えるべきものはある.
- momentum
- adam
- adagrad
- rmsprop
optimizerで,実際に追加しているopsは,
- compute_gradients
- apply_gradients
これらをbatch単位で実行
for i in range(1000):
  batch = mnist.train.next_batch(50)
  train_step.run(feed_dict={x: batch[0], y_: batch[1]})
Evaluate the Model
予測する.argmaxは便利関数で第2引数で持していした軸で最大値をとるindexを返してくれる.tf.equalでboolを返す.
correct_prediction = tf.equal(tf.argmax(y,1), tf.argmax(y_,1))
interactiveにチェックしたかったら,tensor.eval(feed_dict={...})でfeedする.
boolをfloatにキャストして,平均をとる.
accuracy = tf.reduce_mean(tf.cast(correct_prediction, "float"))
最後にevalしてチェック
print accuracy.eval(feed_dict={x: mnist.test.images, y_: mnist.test.labels})
91%くらいの精度がでる.
Build a Multilayer Convolutional Network
CNNを使ったREPLの例.
ネットワークのアーキテクチャは,
(conv + relu + maxpooling) * 2
\+ (affine + relu)
\+ dropout
\+ (affine + softmax)
これらを一気に書くと(xをreshapeしているので注意),
# Helper func
def weight_variable(shape):
  initial = tf.truncated_normal(shape, stddev=0.1)
  return tf.Variable(initial)

def bias_variable(shape):
  initial = tf.constant(0.1, shape=shape)
  return tf.Variable(initial)

def conv2d(x, W):
  return tf.nn.conv2d(x, W, strides=[1, 1, 1, 1], padding='SAME')

def max_pool_2x2(x):
  return tf.nn.max_pool(x, ksize=[1, 2, 2, 1],
                        strides=[1, 2, 2, 1], padding='SAME')

# Parameter at conv1 (kernel_size, kernel_size, in_map, out_map)
W_conv1 = weight_variable([5, 5, 1, 32])
b_conv1 = bias_variable([32])

# Reshape image
x_image = tf.reshape(x, [-1,28,28,1])

h_conv1 = tf.nn.relu(conv2d(x_image, W_conv1) + b_conv1)
h_pool1 = max_pool_2x2(h_conv1)

# Parameter at conv2
W_conv2 = weight_variable([5, 5, 32, 64])
b_conv2 = bias_variable([64])

h_conv2 = tf.nn.relu(conv2d(h_pool1, W_conv2) + b_conv2)
h_pool2 = max_pool_2x2(h_conv2)

# Parameter at affine 1
W_fc1 = weight_variable([7 * 7 * 64, 1024])
b_fc1 = bias_variable([1024])

# Reshape to [batch, feature]
h_pool2_flat = tf.reshape(h_pool2, [-1, 7*7*64])
h_fc1 = tf.nn.relu(tf.matmul(h_pool2_flat, W_fc1) + b_fc1)

# Dropout
keep_prob = tf.placeholder("float")
h_fc1_drop = tf.nn.dropout(h_fc1, keep_prob)

# Parameter at affine 2
W_fc2 = weight_variable([1024, 10])
b_fc2 = bias_variable([10])

# Softmax
y_conv=tf.nn.softmax(tf.matmul(h_fc1_drop, W_fc2) + b_fc2)

# Loss
cross_entropy = -tf.reduce_sum(y_*tf.log(y_conv))

# Train op
train_step = tf.train.AdamOptimizer(1e-4).minimize(cross_entropy)

# Eavl op
correct_prediction = tf.equal(tf.argmax(y_conv,1), tf.argmax(y_,1))
accuracy = tf.reduce_mean(tf.cast(correct_prediction, "float"))

# Init
sess.run(tf.initialize_all_variables())

# Train
st = time.time()
for i in range(20000):
  batch = mnist.train.next_batch(50)
  if i %100 == 0:
    train_accuracy = accuracy.eval(feed_dict={
        x:batch[0], y_: batch[1], keep_prob: 1.0})
    print "step %d, training accuracy %g" % (i, train_accuracy)

  train_step.run(feed_dict={x: batch[0], y_: batch[1], keep_prob: 0.5})

print "elapsed time %f [s]" % (time.time() - st)

# Evalute
print "test accuracy %g" % accuracy.eval(feed_dict={
    x: mnist.test.images, y_: mnist.test.labels, keep_prob: 1.0})
結果 (GPU/cudnnあり)99%くらいの精度になる.
APIの説明をみると,コードに出てくる4D tesorは,[batch, height, width, channels]だと思う.なので,maxpoolingではksize=[1, 2, 2, 1], strdies=[1, 2, 2, 1]でheight, width方向に重複なしでpoolするということ.4Dなのでbatch/in_map方向にもstrideできると考えていいのか.
Tensor Flow: How To
この記事を書いている時点では,0.6.0が最新なので,それを参考にまとめている.
Variables: Creation, Initializing, Saving, and Restoring
Variableはin-memory buffferだからtrainingが終わっったら,永続化させてevalutionとかしたい.
- The tf.Variable class
- The tf.train.Saver class
の説明
Creation
# Create two variables.
weights = tf.Variable(tf.random_normal([784, 200], stddev=0.35),
                      name="weights")
biases = tf.Variable(tf.zeros([200]), name="biases")
こんな感じ.
shapeはtupleでなくてlistで渡している.
tf.Varibalbeは,以下のopsをGraphに追加する
- varialbe op
- initializer op. これが,実際にinit valを与える.実際はtf.assign op
- initial valueに対するop. 上記の例だと,random_normal, zeros
Initialization
opする前に,varialbeをinitializeしろという話.
一番簡単なのは,tf.initialize_all_variables().
varialbe valueは,checkpointからも復帰可能.
こんな感じ
import tensorflow as tf

# Create two variables.
weights = tf.Variable(tf.random_normal([784, 200], stddev=0.35),
                      name="weights")
biases = tf.Variable(tf.zeros([200]), name="biases")
...
# Add an op to initialize the variables.
init_op = tf.initialize_all_variables()

# Later, when launching the model
with tf.Session() as sess:
  # Run the init operation.
  sess.run(init_op)
  ...
  # Use the model
  ...
init_opが返ってくるので,sessionの一番初めで,sess.run(init_op)する
Initialization from another Variable
tf.initialize_all_variables()
はパラレルですべての変数を初期値化するので注意すること.
他のVariableの初期値からも初期値化可能
import tensorflow as tf

sess = tf.InteractiveSession()

# Create a variable with a random value.
weights = tf.Variable(tf.random_normal([784, 200], stddev=0.35),
                      name="weights")
# Create another variable with the same value as 'weights'.
w2 = tf.Variable(weights.initialized_value(), name="w2")
# Create another variable with twice the value of 'weights'
w_twice = tf.Variable(weights.initialized_value() * 2.0, name="w_twice")
初期値の同じであることを確認.
# First w2, then depencency, weights is also initialized
w2.initializer.run()
w2.eval()
weights.eval()
Custom Initialization
tf.initialize_all_variables()はすべてのvariablesをinitializeするが,一部をinitすることも可能.
Saving and Restoring
tf.train.Saverはグラフに対して,2つのopを追加する.
- save
- restore
graph上,すべてのvariableに対してでなく,一部でもOK.
Checkpoint Files
Variablesはバイナリで保存されるけれど,大雑把には,map of Varialbe name to Tensor.
Saving Variables
こんな感じで,/tmp/model.ckptにv1, v2が保存される
- saver.py
import tensorflow as tf
import numpy as np

# Create some variables.

v1 = tf.Variable(np.random.rand(10, 5), name="v1")
v2 = tf.Variable(np.random.rand(5, 3), name="v2")
prod = tf.matmul(v1, v2)

# Add an op to initialize the variables.
init_op = tf.initialize_all_variables()

# Add ops to save and restore all the variables.
saver = tf.train.Saver()

# Later, launch the model, initialize the variables, do some work, save the
# variables to disk.
with tf.Session() as sess:
    sess.run(init_op)

    # Run prod
    result = sess.run(prod)
    print result

    # Save the variables to disk.
    save_path = saver.save(sess, "/tmp/model.ckpt")
    print "Model saved in file: ", save_path
Restoring Variables
restoreするときは,init variablesはいらない.
こんな感じ
- restore.py
import tensorflow as tf
import numpy as np

v1 = tf.Variable(np.random.rand(10, 5), name="v1")
v2 = tf.Variable(np.random.rand(5, 3), name="v2")
prod = tf.matmul(v1, v2)

# Add ops to save and restore all the variables.
saver = tf.train.Saver()

# Later, launch the model, use the saver to restore variables from disk, and
# do some work with the model.
with tf.Session() as sess:
    # Restore variables from disk.
    saver.restore(sess, "/tmp/model.ckpt")
    print "Model restored."

    result = sess.run(prod)
    print result #結果が同じになる
元のvarialbes, operationsをしっていないと復帰できないという認識で良いのだろうか?
TensorFlow Mechanics 101
mnistを使ったMLPのhello world的なもの.
git clone https://github.com/tensorflow/tensorflow.git
で持ってきてしまった方が早い.
./tensorflow/tensorflow/examples/tutorials/mnist
にサンプルコードがある.
ここでは,Convolutionは使っていないので注意.MLP.
正直,サンプルコードを見たてデバッガで追ったり,APIリファレンスを見たほうが理解が早い.
Prepare the Data
Download
コードの中にDLが入っているので,特に考えなくていい.
training, validation, test datasetsの内約は
| Dataset | # Samples |
| training | 55000 |
| validation | 5000 |
| test datasets | 10000 |
Inputs and Placeholders
Varialbeでなくて,feeds (placeholder)を使っている.
images_placeholder = tf.placeholder(tf.float32, shape=(batch_size,
                                                       IMAGE_PIXELS))
labels_placeholder = tf.placeholder(tf.int32, shape=(batch_size))
な感じで,tensorの次元が,(batch_size, height*width)になっている.
これは,もとのYann Lecun mnist dataが1次元テンソルだから.minst sampleではちゃんと,別箇になっている.
Build the Graph
3 stepで行っている.
- inference(): forward propのgraph, opsをつくる
- loss(): 誤差計算のopsをinferenceの結果に追加
- training(): optimizationのopsをloss graphに追加する
分類問題に置いては,これがコンベンション.
- inferenceの結果を利用してlossおよびevalutionをすれば良い.
mnist.pyに書いてあるメソッドが分類問題における一般的な書き方だろう.
Inference
mnist.pyに書いてある内容の説明.
with tf.name_scope('hidden1') as scope:
で,この中で作成されるvariablesのprefixに"hidden1"がついて, 例えば,"hidden1/weights"のようになる
name scopeの中はこんな感じで書く.
weights = tf.Variable(
    tf.truncated_normal([IMAGE_PIXELS, hidden1_units],
                        stddev=1.0 / math.sqrt(float(IMAGE_PIXELS))),
    name='weights')
biases = tf.Variable(tf.zeros([hidden1_units]),
                     name='biases')

hidden1 = tf.nn.relu(tf.matmul(images, weights) + biases)
基本weightのinitializationは,tf.truncated_normalでやるらしい.
これを3回繰り返して最後に,logitsを計算(linear sofmax)する.softmaxは,Lossメソッドの中で適用されている.
logits = tf.matmul(hidden2, weights) + biases
softmaxは次のlossで掛けられている.
Loss
分類問題なので,ラベルを1-hot表現にしている.例えば,
label=3で,クラス数が10なら,[0, 0, 0, 1, 0, 0, 0, 0, 0, 0]に変換される.
こんな感じ
batch_size = tf.size(labels)
labels = tf.expand_dims(labels, 1)
indices = tf.expand_dims(tf.range(0, batch_size, 1), 1)
concated = tf.concat(1, [indices, labels])
onehot_labels = tf.sparse_to_dense(
    concated, tf.pack([batch_size, NUM_CLASSES]), 1.0, 0.0)
NUM_CLASSESが入っているので,予めクラス数を知らないとイケない.
tensorflowの枠組みてやっているので,わかりにくいが,別に自分でやってもいい.最終的に,[batch, num_classes]の次元でone-hotになっていればよく,それがTensor Objectでwrapされていて,logitsとcross-entropyをとれれば良い.
最後に,softmaxを適用して,cross entropyを取って,batchs間で平均をとる.
cross_entropy = tf.nn.softmax_cross_entropy_with_logits(logits,
                                                        onehot_labels,
                                                        name='xentropy')

loss = tf.reduce_mean(cross_entropy, name='xentropy_mean')
Training
lossを受け取ってoptimizerにして,minimizeする.
conventionとして覚えておくといい.
optimizer = tf.train.GradientDescentOptimizer(FLAGS.learning_rate)
global_step = tf.Variable(0, name='global_step', trainable=False)
train_op = optimizer.minimize(loss, global_step=global_step)
Train the Model
fully_connected_feed.pyに書いてある内容の説明
The Graph
with tf.Graph().as_default():
でopsをgroupとして実行する.graphはopsの集まり.普通はgraphが1つ十分だけれども,複数のgraphの実行も可能.
The Session
必要なopsのbuildが終わったらsessionを作ってrunする.
基本は,初めにinitすること.
sess = tf.Session()
init_op = tf.initialize_all_variables()
sess.run(init_op)
tf.Sessionが引数なしだと,codeは,default local sessionに追加される.
Train Loop
trainする. trainingをコントロールしたかったら,このループで行えばい.
for step in xrange(max_steps):
    sess.run(train_op)
*** Feed the Graph
このサンプルでは,feedでデータを食わしている.
theano.function()の使い方に似ている.updates argumentがopになった感じ.
*** Check the Status
for step in xrange(FLAGS.max_steps):
    feed_dict = fill_feed_dict(data_sets.train,
                               images_placeholder,
                               labels_placeholder)
    _, loss_value = sess.run([train_op, loss],
                             feed_dict=feed_dict)
train_opはOperationなので,なにも値を返さない,lossは値を返すのでそれを受け取る.fetchでは,inputがlistだと,tuple of np.arrayで返ってくる.
*** Visualize the Status
Tensorboardでvisualizeするために,
- summary_op
- SummaryWriter
を作る.
SummaryWriterはCheckpointを設けるSaverとは別で,Visualize用なので注意.
Graphを構築する過程で,
summary_op = tf.merge_all_summaries()
で1つのsummary_opを作る.
sessionの中で,
summary_writer = tf.train.SummaryWriter(FLAGS.train_dir,
                                        graph_def=sess.graph_def)
SummaryWriterを作る.
そして,summary_opを実行して,結果をwriterに addする.
summary_str = sess.run(summary_op, feed_dict=feed_dict)
summary_writer.add_summary(summary_str, step)
*** Save a Checkpoint
モデルをrestoreするのにcheckpointを設けているという話.
saver.save(sess, FLAGS.train_dir, global_step=step)
Evaluate the Model
Build the Eval Graph
Eval Output
特に説明は不要.
eval_correct = tf.nn.in_top_k(logits, labels, 1)
でtop_kの予測値の中に正解があったら1とするというopがあってそれを使っているくらい.labelsはTensor objectで,batch_sizeのclass index array.
TensorBoard: Visualizing Learning
パラメータの学習過程,目的関数の時間的推移などを可視化するツール.可視化するデータは,Summary protobuf objectでシリアライズされて,SumaryWriter経由でディスクに吐出される.TensorBoardはそれを読み込むpythonのhttp server. 特にWAFを使っているわけではなくて,BaseHTTPServer.HTTPServerを拡張してるだけ.
See
/usr/local/lib/python2.7/dist-packages/tensorflow/tensorboard/tensorboard.py
基本的な使い方
- 可視化したいノードにsummary opをつける
- 例えば誤差関数の値を見たいなら
- tf.scalar_summary(loss.op.name, loss)
- summary opはgraphの付随品
- 実行しているopはsummary nodeに何も依存しないので,summayr opは別途実行する
- tf.merge_all_summariesで全部一緒のopにする
- summary nodeは別途実行する必要があるが,一つ一つ実行するのは面倒なのでこうする
- summary_writerを作る
- graphを可視化したい場合は,GrahpDefを引数に入れておく
- summary opを実行した結果 (summary_str)をsummary_writer.add_sumary(summary_str, step)する
- 毎回実行より,n-step毎に実行したほうがいい
やっていることは,基本的な使い方の通り.
TensorBoard: Graph Visualization
Summaryをディスクに吐いたら,指定したディレクトリを引数にして,tensorboardを立ち上げる.
python tensorflow/tensorboard/tensorboard.py --logdir=path/to/log-directory
いい感じのグラフが出てくる.
Name scoping and nodes
The better your name scopes, the better your visualization
は覚えておいたほうがいい.
こんな感じで,scopeを書いておくと
import tensorflow as tf

with tf.name_scope('hidden') as scope:
  a = tf.constant(5, name='alpha')
  W = tf.Variable(tf.random_uniform([1, 2], -1.0, 1.0), name='weights')
  b = tf.Variable(tf.zeros([1]), name='biases')
可視化した時に,hiddenと表示されて,クリックすると詳細が見れる.
Interaction
実際にtensorboardを動かして,実際のgraphを見たほうが早い.
アイコンの説明は,ここ
ノードの色に関しては,Structure viewとDevice viewがあるくらいは覚えておいたほうがいい.
Reading Data
データの食わせ方は3つある
- Feeding: step毎にpthon コードでデータを食わせる. placeholderを使う方法.
- Reading from files: インプットパイプラインが,graphの初めに,ファイルからデータを読み込む.
- Preloaded data: Constant or Variableがすべてのデータを保持する.小さいデータ向け.基本はGPUで計算する前提だと思うので,GPUメモリに収まるくらい.
Feeding
placeholderを使うデータの食わせ方は,
を見るのが早い.
fully_connected_feed.pyのfill_feed_dict関数.
Reading from files
基本的なパイプライン
- ファイル名のリスト
- リストのシャッフル (Optional)
- epochにリミットを書ける (Optional)
- Filename queue
- ファイルフォーマットに対するReader
- ファイルのレコードに対するDecoder
- 前処理 (Optional)
- Example queue
Filenames, shuffling, and epoch limits
基本はデータがあるファイルのリストがあって,それらを読み込むためのFIFO Queueを作るまでの過程.
ファイルリストは,
- Tensor (like ["file0", "file1"] or [("file%d" % i) for i in range(2)]) でTensor of listにするか
- tf.train.match_filenames_onceでパターン(glob)を渡す
それをtf.train.string_input_producerに渡す.
tf.train.string_input_producerの引数として,shuffle, max_epochsがある.shuffle=Trueだとepoch毎にファイルリストをshuffleする.Queue runnerは,1 epochで1回だけファイルリストを全部,queueに入れる.shuffleなので,uniform sampling (under-/over-samplingではない).これは,reader (filenameをqueueから読み込む)と別スレッドで動くので,readerをblockはしない.
*** CSV files
csv file を読むときは,tf.TextLineReaderクラスとtf.decode_csv を使う.
TextLineReader.readは1行を読み込んでkey, valueを返すので,decode_csv op にvalueとrecord_defaultsを渡す.decode_csv opはlist of Tensorを返す.reacord_defaultはlist of Tensorのタイプとvalueに値がはいってこなかったときのdefault値となる.
サンプルを見る感じだと,1行が1(サンプル,ラベル)でサンプルはベクトルで表現されている場合の至極一般的なフォーマットを扱うときに使用する.
取り敢えずiris.dataを持ってきてサンプルを動かす.
あやめを3つコピーしてから,サンプルを動かしてみる.
- サンプル
import tensorflow as tf

filename_queue = tf.train.string_input_producer(["iris0.csv", "iris1.csv", "iris2.csv"])

reader = tf.TextLineReader()
key, value = reader.read(filename_queue)
# Default values, in case of empty columns. Also specifies the type of the
# decoded result.
record_defaults = [[1.0], [1.0], [1.0], [1.0], [""]]
col1, col2, col3, col4, col5 = tf.decode_csv(
    value, record_defaults=record_defaults)

#features = tf.concat(0, [col1, col2, col3, col4])
features = tf.pack([col1, col2, col3, col4])

with tf.Session() as sess:
    # Start populating the filename queue.
    coord = tf.train.Coordinator()
    threads = tf.train.start_queue_runners(coord=coord)

    for i in range(1200):
        # Retrieve a single instance:
        example, label = sess.run([features, col5])
        print "Example: ", example
        print "Label: ", label

    coord.request_stop()
    coord.join(threads)
tf.concatだとcolが'TensorShape([])',すなわちscalarなので,concatできないよう.なので,tf.packを使っている.
*** Fixed length records
バイナリファイルで,1 recordが固定長の場合は,tf.FixedLengthRecordReaderとtf.decode_rawを使う.decode_rawはstring vaueをTensorに変換する.
Cifar10のサンプルではこれを使っている.
cifar10_input. valueが3073 bytesで初めの1byteがラベル.残り(depath, width, height)=(3, 32, 32)が画像.
サンプルではsliceして取り出している.
*** Standard TensorFlow format
TenforFlowで推奨のProtocol Bufferを使うフォーマット.proto3 syntaxなので注意.
を使っている.ExampleはFeaturesをラップしている.Exampleをみると,下記4つが主なmessageに見える.
- Feature: BytesList (repeated bytes), FloatList (repeated float), IntList (repeated int64)
- Features: map of feature name to feature
- FeatureList: repeated Feature
- FeatureLists: map of feature name to feature list
FeatureListはsequence input用.Exampleが実際に1つのラベル付きサンプルを表現している.
書き込むときは,Example messageを書いたら,シリアアライズしてstringにして,TFRecordWriterでTFRecordsファイルにする.サンプルがわかりやすい.
読み込むときは,tf.TFRecordReaderとtf.parse_single_exampleを使う.TFRecordはこれ.読み込む場合のサンプル
初めからProtoBufを使っていれば,Javaにポートするときに非常に
Batching
input pipelineの最後にやる.インプットファイルキューとは別のキューを使う様.
tf.train.shuffle_batchを使う.これは,サンプルの順序をランダマイズする.なので,基本のinput pipelineは,
- filesをランダマイズ,
- 各fileでexampleをランダマイズ
- batch単位でinput data
を取り出すという感じ.
もっと並列度またはファイル間でもshufflingしたい場合は,tf.train.shuffle_batch_joinを使う. tf.train.shuffle_batchでのthread numを増やすと並列度が上がる.この場合は,1つのファイルから複数threadでサンプルを読み込む.
この辺はdisk-ioとか同じサンプルをbatchに入れるとかいれないとのトレードオフだと思われる.
tf.train.shuffle_batch*がsummryをgraphに追加するので,tensor boardでサマリーが見れるて,example queueが常に0より大きければ,十分なthread数を使っている.
Creating threads to prefetch using QueueRunner objects
次のパターンがテンプレ.sessionのwith statement contextでやってもいいと思う.
# Create the graph, etc.
init_op = tf.initialize_all_variables()

# Create a session for running operations in the Graph.
sess = tf.Session()

# Initialize the variables (like the epoch counter).
sess.run(init_op)

# Start input enqueue threads.
coord = tf.train.Coordinator()
threads = tf.train.start_queue_runners(sess=sess, coord=coord)

try:
    while not coord.should_stop():
        # Run training steps or whatever
        sess.run(train_op)

except tf.errors.OutOfRangeError:
    print 'Done training -- epoch limit reached'

finally:
    # When done, ask the threads to stop.
    coord.request_stop()

# Wait for threads to finish.
coord.join(threads)
sess.close()
ここにある絵を見ると何やっているかわかりやすい.
Filtering records or producing multiple examples per record
- [batch, x, y, z]のbatchを0にするとそこはfilteringできる.
- 1 recordから複数のサンプルを生成したい場合は,shuffle_batch時にenqeueu_many=Trueをつける.
Sparse input data
SparseTensorの場合は
- batchingする前にtf.parse_single_exampleを呼ばない.
- batchingした後にtf.parse_exampleを呼ぶ.
Preloaded data
小さいデータセットに対して使うデータの食わせ方.2通りあって,
- データをConstantに入れる
- データをVariableに入れる
Constantに入れるのは,簡単だけど,たまに多重化されるらしいので,使わない方がいいらしい.
Variableに入れるのは,こんな感じ
training_data = ...
training_labels = ...
with tf.Session() as sess:
  data_initializer = tf.placeholder(dtype=training_data.dtype,
                                    shape=training_data.shape)
  label_initializer = tf.placeholder(dtype=training_labels.dtype,
                                     shape=training_labels.shape)
  input_data = tf.Variable(data_initalizer, trainable=False, collections=[])
  input_labels = tf.Variable(label_initalizer, trainable=False, collections=[])
  ...
  sess.run(input_data.initializer,
           feed_dict={data_initializer: training_data})
  sess.run(input_labels.initializer,
           feed_dict={label_initializer: training_lables})
ポイントは,
- trainable=False
- GraphKeys.TRAINABLE_VARIABLES collectionに,この変数を入れないようにして,学習時に変数をupdateさせないようにする.
- collections=[]
- GraphKeys.VARIABLES collectionに変数を入れないようにして,saving/restoring checkpointで,変数を無視する.
多分batch trainingしたいときに使うのだろう.多分あまり使わないので,とりあえず無視でいいと思う.
Multiple input pipelines
trainしながらevalするときにこうやったら良いという話.
- traninig時に,チェックポイントを吐き出す
- evaluation時に,チェックポイントを読みだして,inferenceする.
同じグラフ,同じプロセスでtraining/evaluationも可能で,それらの間でVariableの共有もできる.
Cifar10がサンプル.
所感
結構面倒と思っていたCoordinator/QueueRunnerのinput pipelineを使ったほうがいいかも.どうせ,Feedingでも複数threadでinputデータを先読みするコードを書く羽目になると思う.プロダクションに入れるとかなったら,Protocol Bufferでモデルパラメータを扱えたほうが便利なので,初めからTensorFlow formatを選択したほうがいいのかも.
Threading and Queues
Tensorflowにおいてqueueは状態を持つ(Variable)のようなノード.一般的なノードは,queueに対して,enqueue/dequeuができる.
Queue Use Overview
- FIFOQueue
- RandomShuffleQueue
がインプリされている.
Session objectはmultithreadedなので,他のスレッドも同じSessionを使えて,opsをパラで実行できる.
TFでは2つのクラスを公開している
- tf.Coordinator
- multiple threadsを一緒に止める
- threadが止まるまで待つような例外をプログラムに送る
- tf.QueueRunner:
- threadsをつくる
- threadsが協調して同じqueueにtensorをenqueueする
基本は一緒に使う.
Coordinator
手法なメソッドは3つ
- shoud_stop(): threadが止まるべきならTrue
- request_stop(
): should stopのリクエストを送る - join(
- ): 指定されたthreadsが止まるまで待つ
こんな感じがテンプレ的な使い方
# Thread body: loop until the coordinator indicates a stop was requested.
# If some condition becomes true, ask the coordinator to stop.
def MyLoop(coord):
  while not coord.should_stop():
    ...do something...
    if ...some condition...:
      coord.request_stop()

# Main code: create a coordinator.
coord = Coordinator()

# Create 10 threads that run 'MyLoop()'
threads = [threading.Thread(target=MyLoop, args=(coord)) for i in xrange(10)]

# Start the threads and wait for all of them to stop.
for t in threads: t.start()
coord.join(threads)
QueueRunner
enqueue opをするthreadsを作る.coordinatorに例外が報告された時にqueueを閉じてくれるthreadも作る.
tf.train.start_queue_runnersを使うテンプレよりもrawなサンプル
enqueue_opとtrain_opを作る
example = ...ops to create one example...

# Create a queue, and an op that enqueues examples one at a time in the queue.
queue = tf.RandomShuffleQueue(...)
enqueue_op = queue.enqueue(example)

# Create a training graph that starts by dequeuing a batch of examples.
inputs = queue.dequeue_many(batch_size)
train_op = ...use 'inputs' to build the training part of the graph...
QueueRunner/Coordinatorをつくて,threadsを起動
# Create a queue runner that will run 4 threads in parallel to enqueue examples.
qr = tf.train.QueueRunner(queue, [enqueue_op] * 4)

# Launch the graph.
sess = tf.Session()

# Create a coordinator, launch the queue runner threads.
coord = tf.train.Coordinator()
enqueue_threads = qr.create_threads(sess, coord=coord, start=True)

# Run the training loop, controlling termination with the coordinator.

try:
  for step in xrange(1000000):
      if coord.should_stop():
          break
      sess.run(train_op)

execpt Exception e:
      coord.request_stop()

# Terminate as usual.  It is innocuous to request stop twice.
coord.request_stop()

# And wait for them to actually do it.
coord.join(enqueue_threads)
Adding a New Op
これは別途.
Custom Data Readers
これは別途.
Using GPUs
Supported devices
で実行すると,a, bはcpuで実行されて,cは(あれば)gpuで実行される.
Logging Device placement
opとtensorがどのdeviceに割り当てられているかを知りたいときは,log_device_placement=Trueにする.
こんな感じ
sess = tf.Session(config=tf.ConfigProto(log_device_placement=True))
Manual device placement
device contextを使う.
import tensorflow as tf

# Creates a graph.
with tf.device('/cpu:0'):
    a = tf.constant([1.0, 2.0, 3.0, 4.0, 5.0, 6.0], shape=[2, 3], name='a')
    b = tf.constant([1.0, 2.0, 3.0, 4.0, 5.0, 6.0], shape=[3, 2], name='b')

c = tf.matmul(a, b)
# Creates a session with log_device_placement set to True.
sess = tf.Session(config=tf.ConfigProto(log_device_placement=True))
# Runs the op.
print sess.run(c)
で実行すると,a, bはcpuで実行されて,cはgpuで実行される.
Using a single GPU on a multi-GPU system
基本は,一番小さいindexのgpuで実行されるが,指定も可能
# Creates a graph.
with tf.device('/gpu:2'):
    ...
指定したdeviceが存在しない場合は,InvalidArgumentErrorが発生するが,allow_soft_placement=Trueを指定すると,勝手に選んでくれる(多分一番小さいindexのgpu, 空いているgpuでないと思われる: 未検証).
# Creates a session with allow_soft_placement and log_device_placement set
# to True.
sess = tf.Session(config=tf.ConfigProto(
     allow_soft_placement=True, log_device_placement=True))
     ...
Sharing Variables
複雑なモデルを組むときには,多くのVarialbe setをシェアする必要がよくあるし,それらを全部,一緒にinitializeしたくなる.そういう場合に使うのが,
- tf.variable_scope()
- tf.get_variable()
ここはその説明.
こんなモデル, (Conv+ReLue) * 2 filterがあったとき
def my_image_filter(input_images):
    conv1_weights = tf.Variable(tf.random_normal([5, 5, 32, 32]),
        name="conv1_weights")
    conv1_biases = tf.Variable(tf.zeros([32]), name="conv1_biases")
    conv1 = tf.nn.conv2d(input_images, conv1_weights,
        strides=[1, 1, 1, 1], padding='SAME')
    relu1 = tf.nn.relu(conv1 + conv1_biases)

    conv2_weights = tf.Variable(tf.random_normal([5, 5, 32, 32]),
        name="conv2_weights")
    conv2_biases = tf.Variable(tf.zeros([32]), name="conv2_biases")
    conv2 = tf.nn.conv2d(relu1, conv2_weights,
        strides=[1, 1, 1, 1], padding='SAME')
    return tf.nn.relu(conv2 + conv2_biases)
このモデルを使いたいが,2つimage1, imave2をこのモデル(関数)に食わせる場合
# First call creates one set of variables.
result1 = my_image_filter(image1)
# Another set is created in the second call.
result2 = my_image_filter(image2)
と呼ぶと,変数が2重に作らてしまう.
変数を外だしするのが一般的なやりかたと思が,例えば,"map of name to variable"のdictionaryを作ると,
- graphを作るコードで,name, type, shapeをドキュメント化しないとならない
- コードが変わると,それを呼ぶ人は多かれ少なかれ別のVarialbeを作らないとイケないかもしれない
この問題に対処するには,クラス化して,クラスの中で,Variableを気をつけて扱わう.しかし,もっと簡単な方法をTFでは提供している.それが,Variable Scope.
Variable Scope Example
Varialbe Scopeで使う主なメソッドは,2つで主な役割は
- tf.variable_scope(
, , ): nameのVariableを作る - tf.get_variable(
): tf.variable_scopeに与えられたnameのnamespaceを提供
initializerはいくつか提供されていて,例えば
- tf.constant_initializer(value)
- tf.random_uniform_initializer(a, b)
- tf.random_normal_initializer(mean, stddev)
機能は名前の通り.
前述のコードをtf.get_varialbeとtf.varialbe_scopeで書き直すと,
conv_relu
def conv_relu(input, kernel_shape, bias_shape):
    # Create variable named "weights".
    weights = tf.get_variable("weights", kernel_shape,
        initializer=tf.random_normal_initializer(0, 1))
    # Create variable named "biases".
    biases = tf.get_variable("biases", bias_shape,
        initializer=tf.constant_initializer(0.0))
    conv = tf.nn.conv2d(input, weights,
        strides=[1, 1, 1, 1], padding='SAME')
    return tf.nn.relu(conv + biases)
method1を2回呼びたいので,variale_scopeで別の名前空間をつければ問題ない.
my_image_filter
def my_image_filter(input_images):
    with tf.variable_scope("conv1"):
        # Variables created here will be named "conv1/weights", "conv1/biases".
        relu1 = conv_relu(input_images, [5, 5, 32, 32], [32])
    with tf.variable_scope("conv2"):
        # Variables created here will be named "conv2/weights", "conv2/biases".
        return conv_relu(relu1, [5, 5, 32, 32], [32])
次に,my_image_filterを2回呼ぶと,
result1 = my_image_filter(image1)
result2 = my_image_filter(image2)
# Raises ValueError(... conv1/weights already exists ...)
ValueErrorがでるので,もう一度 variable_scopeを使って,その中でscope.reuse_variableを使う.
with tf.variable_scope("image_filters") as scope:
    result1 = my_image_filter(image1)
    scope.reuse_variables()
   result2 = my_image_filter(image2)
How Does Variable Scope Work?
Understanding tf.get_variable()
tf.get_variable()の挙動の理解
1. reuse == False (default)
- {scope name}/{varialbe name}でVariableを作る
- {scope name}/{varialbe name}が既に存在するか調べてあったら,ValueError
2. reuse == True
- {scope name}/{varialbe name}が既に存在するか調べる
- なかったら,ValueError
- あったら,既に存在するVariableを返す.
Basics of tf.variable_scope()
- varialbe_scopeはnested可能.
- "{scope name1}/{scope name2}/{variable name}"みないな名前になる
- 現在のvairalbe scopeが取得可能
- tf.get_variable_scope()
- tf.get_variable_scope().reuse_varialbes()でreuse=Trueになる
- reuse = Falseにはできないので注意.Trueが優先される
- 例えば,第3者がreuse=Trueとしたときに,コード書いた人が関数の中で,resue=Falseとやってしまうと,第3者は思っても見ない挙動を関数がしたとなるから
- reuseは継承する
- resue=Trueのvarialbe scopeの中でまたvariable scopeを開くとそのスコープもreuse=True
Capturing variable scope
tf.varialbe_scope(name)のnameには他のVariableScopeを渡すことも可能.
あるscopeの中で,scopeをnestし,VariableScopeを渡すと,上位のscopeのname prefixはつかない.
# Jump out of the current variable scope when passing VariableScope
with tf.variable_scope("foo") as foo_scope:
    assert foo_scope.name == "foo"

with tf.variable_scope("bar"):
    with tf.variable_scope("baz") as other_scope:
        assert other_scope.name == "bar/baz"
        with tf.variable_scope(foo_scope) as foo_scope2:
            assert foo_scope2.name == "foo"  # Not changed.
Initializers in variable scope
ある程度まとめてinitializeしたいときはvarialbe_scope(initializer=...)を使ってしまう.すると,scope内のVariable.initializerはこれを使う.明示的にVarialbe.initializerを使うとoverrideする.
サンプル
import tensorflow as tf


with tf.Session() as sess:


    with tf.variable_scope("foo", initializer=tf.constant_initializer(0.4)):
        v = tf.get_variable("v", [1])
        v.initializer.run()
        assert v.eval() == 0.4  # Default initializer as set above.

        w = tf.get_variable("w", [1], initializer=tf.constant_initializer(0.3))
        w.initializer.run()
        assert w.eval() == 0.3  # Specific initializer overrides the default.

        with tf.variable_scope("bar"):
            v = tf.get_variable("v", [1])
            v.initializer.run()
            assert v.eval() == 0.4  # Inherited default initializer.

        with tf.variable_scope("baz", initializer=tf.constant_initializer(0.2)):
            v = tf.get_variable("v", [1])
            v.initializer.run()
            assert v.eval() == 0.2  # Changed default initializer.

sess.close()
Names of ops in tf.variable_scope()
今まではvarialbe nameに関して議論していたが,今度はop.nameはどうなるかという話で,opもvariable_scope(name)のnameを共有する.
with tf.variable_scope("foo"):
    x = 1.0 + tf.get_variable("v", [1])
assert x.op.name == "foo/add"
name_scopeもvariable_scopeと一緒に開ける.その場合,name_scopeはop.nameにのみ影響を与える.
# op name only affected by using name_scope
with tf.variable_scope("hoo"):
    with tf.name_scope("bar"):
        v = tf.get_variable("v", [1])
        x1 = 1.0 + v
assert v.name == "hoo/v:0"
assert x1.op.name == "hoo/bar/add"
variable_scope/name_scopeをひっくり返しても同様.
Examples of Use
variable scopeを使っている例
- models/image/cifar10.py
- models/rnn/rnn_cell.py
- models/rnn/seq2seq.py
RNNだとパラメータシェアをたくさんするのでvariable_scopeを使ったVarible.resuse=Trueをよく使う.
全体所感
KerasやChainerと比べると使えるようになるまでに面倒臭さがあると思う.機能が多い分だと思うがコスパが低い.なので,skflowとかでてる.各library masterから見たら,多分使わんかもしれない.と言ってもKeras BackendにTensorFlowを選べるが.とりあえず,Googleが出しているからみんな注目してることに変わりはないはず.この記事を書いている時点で,OSSになってからまだ,2ヶ月なので,半年後には行く末がわかるかな....skflowみたいな使いやすくしました的なラッパーは結構でるかも.でも,演算部分はTheanoに似ている気がするし,ちゃんとhow toを読めば普通に使えると思った.
Python: ZeroMQ2
基本パターン
- req/res: server/client (server-client blocking, a client can connect to many servers)
- pub/sub: broadcast (non reliable publish)
- push/pull: loadbalancing
は以前やった
kzky.hatenablog.com
ので,
Intermediaries and Proxiesを学べば,大体の基本パターンは網羅したことになる.
Intermediaries and Proxiesとは,
The messaging industry calls this intermediation, meaning that the stuff in the middle deals with either side. In ZeroMQ, we call these proxies, queues, forwarders, device, or brokers, depending on the context.
というように,message brokerとかproxyのような仲介者のこと.
これらは,zeromqではdevicesなんて呼ばれたりする.
ここではDeviceが用意されている3パターンをまとめる.
The Dynamic Discovery Problem
PUB/XSUB/XPUB/SUBのメッセージングパターン
どうやって追加されたノードを動的に見つけるか?
一番簡単なのは,ハードコード(再設定)すること.ハードコードだと,ノード動的に追加されたら,コードを変えて,プロセスを起動する.publisher-to-subscriberが1-to-nなら,subscriberを起動すればいいが,publisher-to-subscriberがn-to-mの場合はそう簡単にはいなかない.なので,proxyを間に挟むPUB/XSUB/XPUB/SUBのメッセージングパターンを使う.
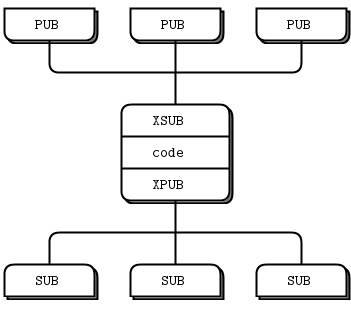
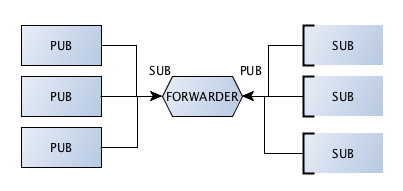
一番簡単な,zmq.FORWARDERを使っている.
XSUB/XPUBの間にコードを挟む場合はpoller.poll()を使う
実行例
各コマンドを別terminalで実行
python forwarder_device.py

python forwarder_subscriber.py
python forwarder_publisher.py
python forwarder_subscriber.py
python forwarder_publisher.py
...
subscriber, publisherの動的な追加および,broadcastされていることを確認する.
Shared Queue (DEALER and ROUTER sockets)
REQ/ROUTER/DEALER/REPのメッセージングパターン
The Dynamic Discovery Problemと似たような問題がある.
serverが3つあって,clientが1つの場合を考える.新しくクライアントを追加しようとする場合に,clientは既存のサーバトポロジーを知っているので,3つのserversを指定すればいい.負荷がもっとかかって,serverを追加したい場合はどうするか?どうやってクライアントは,新しく追加したいサーバを発見する? サービスのペイロードがあまりない夜中に,この作業したくないよね? サーバーのトポロジーを知っているブローカーを置けば,この問題は解決する.


実行例
各コマンドを別terminalで実行
python queue_device.py
...
python queue_server.py
python queue_client.py
...
python queue_server.py
python queue_client.py
deviceは先に立ち上げておくこと.ロードバランシングおよび,server, clientの動的な追加ができていることを確認する.この例はAsyncでなくて,Syncなので注意.
Queue Deviceは,完全なSyncと考えて良い.
自分でもっとコントロールしたり,何かしらコントロールをしたい場合は,poller.pollを使う.
Streamer
PUSH/STREAMER/PULLのメッセージングパターン
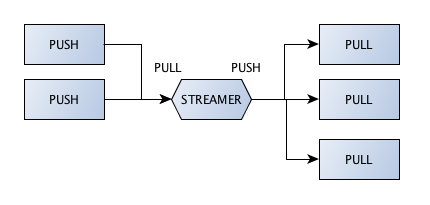
この例はSyncでなくて,Ayncなので注意.push/pullの間にstreamerが入るのが,fire-and-forgetと捉えても良いと思う.
実行例
各コマンドを別terminalで実行
python streamder_device.py

python streamder_server.py
python streamder_server.py
python streamder_client.py
余談
やっぱりミドルウェアではない.柔軟に分散P2Pプログラミングを行いたいとか,自分でMWを作りたい時のlibrary (middle-level API)として使うとかがいい.ただ,メッセージパターンに対するhow-toは用意されているので,python socket moduleを使うよりは楽だと思う.
http://zguide.zeromq.org/page:all#Audience=title:Audience
This book is written for professional programmers who want to learn how to make the massively distributed software that will dominate the future of computing. We assume you can read C code, because most of the examples here are in C even though ZeroMQ is used in many languages. We assume you care about scale, because ZeroMQ solves that problem above all others. We assume you need the best possible results with the least possible cost, because otherwise you won't appreciate the trade-offs that ZeroMQ makes. Other than that basic background, we try to present all the concepts in networking and distributed computing you will need to use ZeroMQ.
参考
- http://zguide.zeromq.org/page:all#Intermediaries-and-Proxies
- http://zguide.zeromq.org/page:all#The-Dynamic-Discovery-Problem
- http://zguide.zeromq.org/page:all#Shared-Queue-DEALER-and-ROUTER-sockets
- http://learning-0mq-with-pyzmq.readthedocs.org/en/latest/pyzmq/devices/queue.html
- http://learning-0mq-with-pyzmq.readthedocs.org/en/latest/pyzmq/devices/devices.html
- http://learning-0mq-with-pyzmq.readthedocs.org/en/latest/pyzmq/devices/streamer.html
- http://stackoverflow.com/questions/14590122/how-to-implement-proxy-broker-for-xpub-xsub-messaging-in-zmq
Python: ZeroMQ
基本
メッセージパッシングフレームワーク or メッセージキューフレームワークの一種.
これらはOSSでいっぱいあり,メッセージブローカーがあるbrokerd, メッセージブローカーがいないbrokerlessに大まかに分類される.ZeroMQはbrokerlessに分類される.アーキテクチャとして,brokerdにすることも可能.
Middlewareというよりは,単なるのsocket abstraction libraryとして捉えたほうがいい.
- Docは,ここ
- まず,どんなパターンがあるか,Messaging-Patternsを読んで,図を眺めるのがいいと思う.
- サンプルコードは
何ができるか
- 分散P2P
- HA (耐障害性)に関しては,high-level featureとしてあるというよりは
- brokerdのBinary Star Pattern
- broker-lessのFreelance-Pattern
で自分で保証して,という感じ.サンプルコード用意している.
Messaging Pattern
- PUB and SUB
- REQ and REP
- REQ and ROUTER (take care, REQ inserts an extra null frame)
- DEALER and REP (take care, REP assumes a null frame)
- DEALER and ROUTER
- DEALER and DEALER
- ROUTER and ROUTER
- PUSH and PULL
- PAIR and PAIR
はできる.
XPUB, XSUB (pub, subのraw version)は参照するが,これら以外の組み合わせは,ドキュメンテーションしていないし,信頼できないと言っている.
各役割に関しては,これが詳しい.
他人のGetting Started
自分でまとめるより,下記
- http://blog.wktk.co.jp/archives/71
- http://blog.pythonisito.com/2012/08/distributed-systems-with-zeromq.html
がまずはとっつきやすい.
公式 Getting Started
http://zguide.zeromq.org/page:all#Chapter-Basicsにサンプルコードのリンクがたくさんあるので,Docを見ながら,コードみるのが良い.
Mycode Samples
以下の3パターンのサンプルが,ここ
REQ/RES: server/client (server-client blocking, a client can connect to many servers)
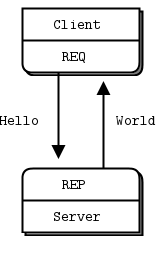
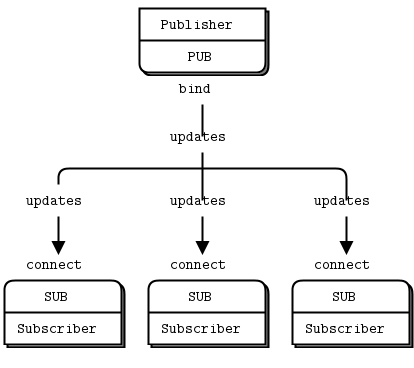
PUB/SUB: broadcast (non reliable publish)
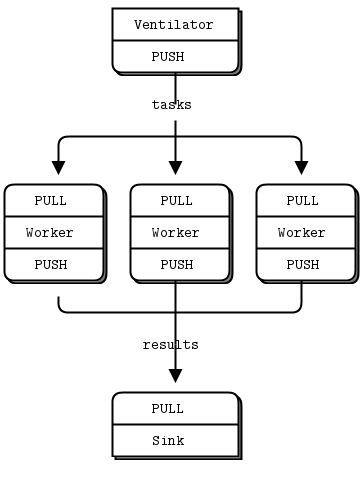
PUSH/PULL: loadbalancing
気をつける点
- network周りのI/Oはbackground threadで行われる,mesageはinput queueに入って,output queueから出て行く
- 基本は1 threadだけど,増やすことも可能. contextに対して増やす操作をする
- 1秒あたり,1 GBのin or out dataあたり,1 threadを目安に考える
- socket.bind()が何回も可能.ただし同じアドレス:ポートの組み合わせはだめ
- 同じsocketをmultithread間で使わない
- 1thread or 1proceessで複数socketsを扱う場合はpollを使う
参考
- http://zeromq.org/
- http://zguide.zeromq.org/page:all
- http://zeromq.org/intro:read-the-manual
- http://postd.cc/dissecting-message-queues/
- http://blog.wktk.co.jp/archives/71
- http://blog.pythonisito.com/2012/08/distributed-systems-with-zeromq.html
- https://github.com/imatix/zguide/tree/master/examples/Python
- http://pyzmq.readthedocs.org/en/latest/api/
- http://learning-0mq-with-pyzmq.readthedocs.org/en/latest/pyzmq/pyzmq.html
- http://learning-0mq-with-pyzmq.readthedocs.org/en/latest/pyzmq/patterns/patterns.html